
The use of TXA in trauma management (following the CRASH 2 trial and its adoption)
29th March 2022
High value and fatality related claims: NHS resolution report
12th April 2022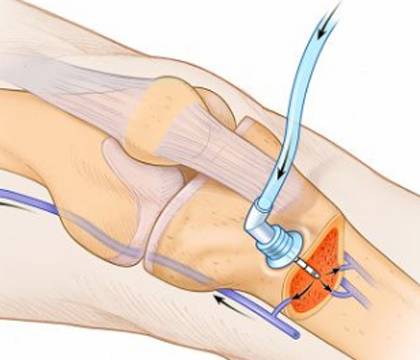
In this article, we explain what you can do when you cannot get IV access and list some of the reasons why you can’t get IV access.
Reasons why you may not get IV access
These are some of the most common reasons why you may struggle to get IV access:
• Dehydration
• Obesity
• A history of intravenous drug use
• Repeated insertion attempts
• Catheter-related complications
What are intraosseous infusions?
An intraosseous infusion is a process of injecting straight into the bone marrow. Medications, fluids and blood products can be injected into the body in this way. Intraosseous infusions provide a non-collapsible entry point.
Step by step guide to using intraosseous infusions
1. Anaethetise the site of the needle insertion
This step applies to conscious patients. It is important to do this to reduce the pain and discomfort that a patient may feel during the infusion.
2. Insert the needle
Palpate the insertion site and stabilise the insertion site. Use your dominant hand to securely and firmly hold the manual needle or the drill. The needle tip must be positioned perpendicular to the bone’s long axis. The needle should be pointed at a 10 to 15-degree angle away from the growth plate and joint space.
Insert the needle with moderate pressure and use a coring, to-and-fro motion. Advance the needle in a straight fashion to make the hole as narrow as possible. When you feel the pop that signifies cortex penetration, stop advancing the needle to prevent it from being pushed into the bone.
3. Confirm the intramedullary placement of the needle
You can confirm the intramedullary placement of the needle if it stands up and remains upright without external support. Remove the stylet and the cap to attach the pre-flushed extension tube and then aspirate. If there is a free return of blood, this also confirms the correct placement. If no blood/bone marrow is aspirated at this stage, you should push between 5ml and 10ml of regular saline. If you feel resistance to this push you should immediately remove the needle and prepare to cannulated a different bone.
4. Start the intramedullary infusion
Follow these steps:
• Instill intramedullary anaesthesia (if dealing with a conscious patient).
• Slowly infuse 2% IV lidocaine (between 3ml and 5ml) over a duration of 2 minutes. Once this is complete, wait 60 seconds before flushing normal saline.
• Start the infusion.
5. Dress the infusion site
Wrap a strike gauze around the entry side of the needle which you should use tape to secure in place.
Advantages of using an intraosseous infusion
One of the main advantages of using an intraosseous infusion is that it is a quick and easy way to inject necessary fluids into the body. This procedure is especially popular in pediatric care. Another advantage is that intraosseous infusions provide non-collapsible vascular access, unlike some other IV processes.

